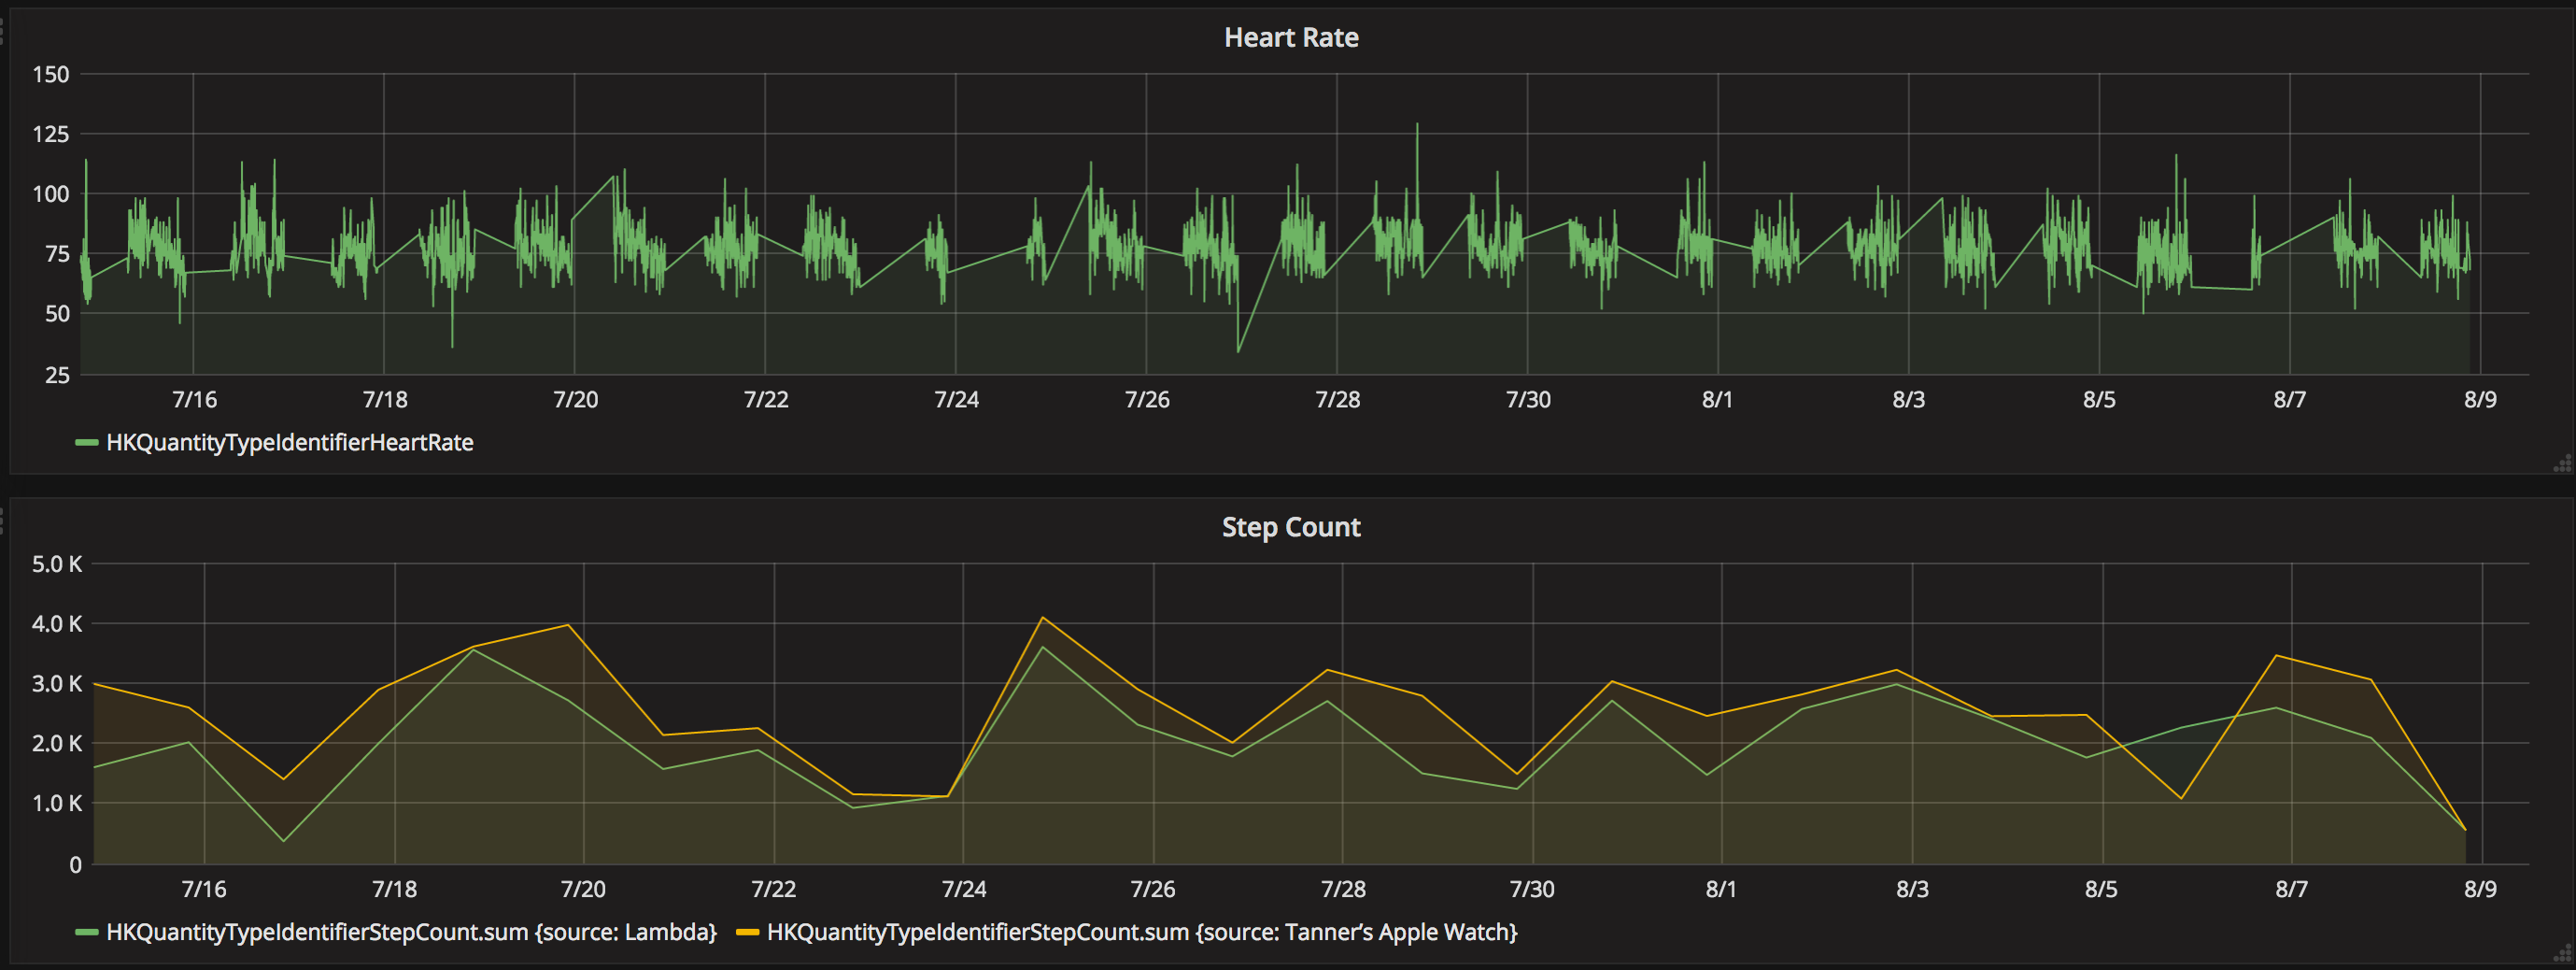
I finally got around to putting Herp Derp’s (tiny) source code out there. I also removed the jQuery dependency because that was overkill. Version 1.6 has been released for Chrome and Firefox.
“Because my garage door doesn’t need an operating system”
I admit – I went a little overkill with the Raspberry Pi garage door opener. A machine so complex was being used to do something so simple: Perform a button press. Why did it need graphics capabilities? A multicore processor? Cron jobs? It didn’t.
Enter the Adafruit Feather HUZZAH ESP8266. All the right junk in all the right places. A simple HTTP request to the Feather, and we’re good to go.
With the recent release of iOS 10 I took it a step further. Could I get this thing to work with Siri? As it turns out, it’s really not that hard:
A really simple project that delivers!
Includes:
- RetroPie
- An SNES-style USB controller
- A Bluetooth speaker
- The Raspberry Pi touch display
- Of course, a Raspberry Pi
The only ‘gotcha’ I came across was when sending audio to the Bluetooth speaker, the emulator I was using (snes9x, the default) got super choppy. This was resolved by adding pisnes as an emulator to EmulationStation and using it instead.
Certbot makes SSL certs laughably easy
SSL is in the house! Certbot makes it trivial: https://certbot.eff.org/
I bookmark. A lot.
I plan to do a more thorough write-up on my plasma-ball project, but for now here’s the video, some pictures, and a link to the repo.
3D Touch force values in Swift
We’re going to see really cool stuff from this. I was curious if 3D Touch in the new iOS devices provided continuous values, or a few discreet ones (light press, semi press, hard press).
Excitingly, you get a nice float back.
Who’s going to be the first to react to users squeezing their phones in a rage? #canfinallyhitstuffharder
import UIKit
class ViewController: UIViewController {
//@IBOutlet weak var buttonOutlet: UIButton!
override func viewDidLoad() {
super.viewDidLoad()
// Do any additional setup after loading the view, typically from a nib.
}
override func didReceiveMemoryWarning() {
super.didReceiveMemoryWarning()
// Dispose of any resources that can be recreated.
}
override func touchesMoved(touches: Set, withEvent event: UIEvent?) {
let touch = touches.first!
let force = touch.force.description
print(force)
}
}
I recently acquired a couple of the awesome 7″ Raspberry Pi touch screens. They’re great except for one thing – how the heck do you hold it up out of the box?
Some third party manufacturers are selling stands, but can dirt-cheap LEGOs accomplish the same thing? Of course. I cooked this up in a few minutes. Three points support the screen perfectly, and a piece is added behind the USB ports to minimize sliding (though that hasn’t been an issue at all).
A downside to this design is that two USB ports are blocked on this model, but you may not need them at all as in my case.
The Mac Pro gets an SSD part 2!
Welp, that didn’t take long. After installing my new SSD I quickly realized I could do better. Upgrading to SATA III from SATA II for less than $60 was a no-brainer.
Installation couldn’t be simpler either: All I had to do was attach the SSD onto the onboard slot and install the PCIe card. After powering on it booted right up, nothing else required.
The Mac Pro gets an SSD
Six years old, and now running even better: The Mac Pro gets a Samsung 850 Pro 512GB SSD housed in an Icy Dock enclosure.
In hindsight I probably should’ve looked into a PCIe SSD to get higher speeds since my 2009 Nehalem machine has only SATA 2.0. Regardless, I’m loving the boost.
Edit: SATA 3 drive controller ordered!